Technical Tips & Tricks
| Site: | Life Strategies LearnOnline |
| Course: | Life Strategies LearnOnline |
| Book: | Technical Tips & Tricks |
| Printed by: | |
| Date: | Saturday, 25 July 2026, 5:42 PM |
Description
Life Strategies recognizes that our students have different comfort levels, experiences, and preferences for online learning. Our goal is to provide a streamlined e-learning experience. To support your success, these technical tips and tricks have been compiled to support students using Life Strategies' e-learning management system, Moodle. This includes students from Life Strategies' LearnOnline programs as well as courses Life Strategies’ is hosting for external training providers.
In each course, there is a Technical Support forum where you can post additional questions or concerns that are not addressed here. For direct assistance, please feel free to call our offices (604-856-2386) or email techsupport@lifestrategies.ca.
1. Computer Requirements
This section will cover several important technical considerations including:
- Hardware & Software Needed
- Problems with Old Internet Browser
- Potential Issues for MAC Users
- Shared Computers
- Uploading Files
1.1. Hardware & Software Needed
We recommend that students have a relatively new computer, either PC or MAC, and run system updates regularly. The e-learning platform does not require downloading any local software onto your computer. You can access the system from any web browser using your secure username and password combination. As such, reliable high-speed Internet access is also essential. While slower computers and/or dial-up Internet will work, students may find the slow response times (e.g., loading course discussions or resources) frustrating and find they spend more time on coursework than they’d anticipated.
For security purposes, it’s best to have a password-protected computer with at least basic anti-virus software. Although pop-up blockers are common, you may need to permit pop-ups from the LearnOnline site to ensure you can fully access content.
Webinar attendees also need, at a minimum, a computer with speakers or reliable telephone line; note, long distance charges will apply for those calling in and are the responsibility of the individual webinar attendee. Students must submit their written assignments using products from the Microsoft Office Suite (e.g., Word) or compatible software. Please note that sharing links from Google docs or Microsoft 365 is not permitted; students must download a compatible version of the file to upload in the assignment dropbox on the course site. On the same note, PDF versions will not permit instructors an opportunity to provide detailed feedback and so consequently should be avoided. It is also expected that students have the latest version of Adobe Acrobat Reader for viewing resources; it can be downloaded free of charge, at www.adobe.com/products/acrobat/readstep2.html.
1.2. Problems with Old Internet Browser
If you are using an old Internet browser to view web pages, you might have problems viewing certain features on any webpage, including Moodle. We recommend using the most up-to-date browser to ensure the best functionality, security, and speed.
At a minimum, you should be using one of the following:
- Chrome 118 (Desktop & mobile) released OCT 2023
- Safari 17 (Desktop) released DEC 2023
- Safari 17 (iOS) released DEC 2023
- Firefox 122 released JAN 2024
To figure out which version you are using visit https://www.whatismybrowser.com/ or check your settings:
- Open your Internet browser
- Find and select the “About,” "Settings," or "Preferences" option
- Note: The specific location of this will vary depending on which system you are using. Use the help feature or search through your settings menu
- Review the dialogue box which will indicate the version or edition being used and if there are any updates available
We’ve found that some Internet browsers seem to be consistently better with our Moodle system than others (e.g., Google Chrome and Mozilla Firefox). If you do run into technical issues due to your Internet browser, try downloading the most up-to-date version and/or using an alternative.
1.3. Shared Computers
When you share computers with anyone (e.g., a shared office or using computers in your resource centre), it is always best practice to:
- Shut down/restart the machine after you have finished your session. Computers are set to store “cookies” (i.e., tiny bits of stored information about each user) to make it easier for you to login to various systems. You will need to get rid of these . . . if you share machines.
- Use the “Logout button” at the top right-hand corner of the LearnOnline site instead of using the little “x” to close the browser window.
1.4. Uploading Files
We do not expect you to upload many files to the course site. The exceptions may be a photo for your profile, and your assignments. There is a maximum file size (100 MB) that the system allows. If you try to upload a file that is too big as the system will tell you that no file was found. On rare occasions, some assignments that are particularly graphic/image heavy may be too large to upload. Please keep this in mind when completing your assignments. If you are not sure how big your file is, highlight the file in the dialog box (as if you were going to double-click to open the file) then right-click and choose properties. The size will be displayed for you. (If you’d like to check while still creating the document within MSWord, simply left click on File/Properties/General.). Please ensure you submit files in a standard program and editable format, such as a Word document.
2. Moodle Basics
There are several basics you'll need to familiarize yourself with as you get started in the course. This section includes:
- Navigating through Moodle
- Setting Your Profile Preferences
2.1. Navigating Through Moodle
To help you navigate to and from resources and activities, all links are set to open in a new tab. This way you can just close the window when you are done with the resource/activity. If you use the back button on your browser to access a previously viewed page, you may run into problems within the course site. You can get "kicked out" of the course and have to login to re-enter . . . a bit tedious and frustrating! A better strategy to move to different parts of the course is to use the (1) breadcrumb trail and/or (2) navigation block.
- Breadcrumb trail - This is the small writing near the top of your screen under the course title. To navigate back to your course’s main page, click on the course name.
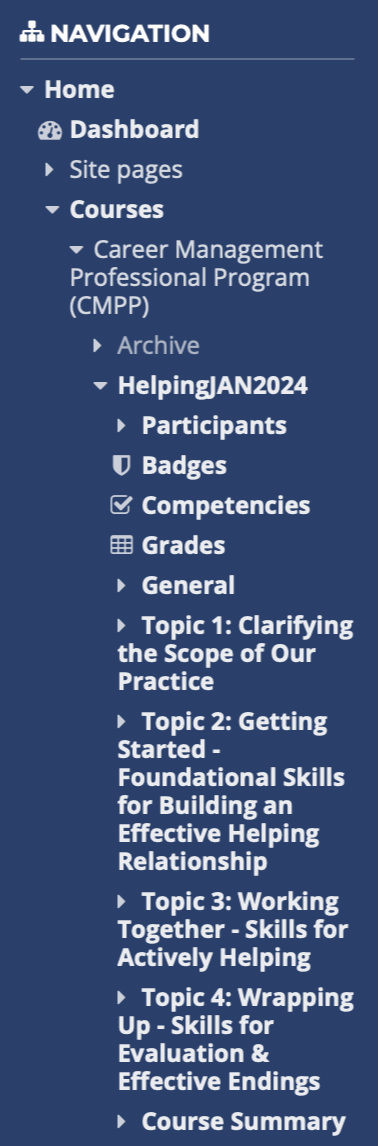
- Navigation block - This block, organized by topic sections, provides links to all activities and resources posted on your course’s main page. It will be generally located within the slide-out menu panel on the left-hand side of every page of your course site.
We use a responsive template, so you may notice some "blocks" shift from the slide to the bottom on your page if you've resized your web browser or are viewing the course on a mobile device or tablet.
Topics will open according to set schedule as detailed in the Course Syllabus or Detailed Course Overview. Topics which are not live will not yet be accessible to you; however, you’ll see a spot for them on the course site. Watch for an announcement via the News/Announcements forum for when the topic opens. You’ll then be able to wrap up your learning activities from the previous topic and move onto the new topic.
2.2. Setting Your Profile Preferences
Here are some tips to help you set profile preferences. Your profile can be accessed from the LearnOnline home page or from within your specific course at any time.
- Click your name on the upper right-hand corner
- Select "Profile"
- Click “Edit profile” from the "User details" section
- Review the options available to you
- Click on “Expand all” to display all settings and options
- Note: If we've set up your profile, you will notice that we’ve also set some standards. These are our recommendations to you; however, feel free to customize to fit your needs
- Set your account preferences
- Email display: Set to “Allow other course members to see my e-mail address”; only hide if you do not want your email shared with other students
- Time Zone: Set to “Server’s local time” so the Moodle times will match your time zone.
- Description: Post a brief bio within this section. This is similar to the type of introduction you would make in a traditional classroom.
- Upload a photo of yourself or some other picture that represents you (e.g., an "avatar") within the "User picture" section. Because we won’t “see” you in person, a photo can help create the classroom atmosphere. You can either drag and drop the picture or click the add file icon
to bring the “File picker” where you can select “Upload a file” and then
- Add any additional information you’d like within the "Additional names," "Interests," and "Optional" sections
- Save your changes by click “Update profile”
3. Course Resources
On your course site, you'll notice several icons, which represent different kinds of resources.
Course Resources include:
- Book
- Pages
- Uploaded Resources
3.1. Books
Book
This resource is a Book. You will also find in many of your courses (i.e., your Course Syllabus is presented as a Book). You can read a Book in order, navigating back and forth with the arrows at the top and bottom on the page, or you can jump to specific sections using the table of contents on the left-hand side.
If you’d like, you can print the full Book or a specific chapter by using the “Print book” or “Print this chapter” under the Administration menu, which is found in the slideout menu panel on the left-hand side.
3.2. Pages
 Pages are used to present a wide variety of content on one web page. Unlike a book, there are no chapters / sub-chapters and you, unfortunately, cannot print them easily.You will find these pages introduce resources, detail assigned readings, and often include links to various web resources (e.g., news/research articles, videos, blog posts) which will enhance your learning. You may also encounter notes with optional reading or viewing material. While they are not required for course completion, we highly recommend you explore their content for further insight and for potential future use.
To ensure functionality, our LearnOnline team checks each link prior to the start of the course. If you are unable to open a web link, this may be a temporary glitch on the website. You can try back a few moments later and if it’s still not available, let us know immediately (i.e., phone our office, email techsupport@lifestrategies.ca, or a post within the Technical Support discussion forum). Our team can help you to access the resource or provide an alternative.
3.3. Uploaded Resources
PDF Resources 
Some course resources have been developed by Life Strategies (or other program developers) or we have obtained permission to share. These are typically posted in a PDF format to ensure compatibility.
If you are having problems opening PDF resources on the course site, ensure you have the latest version of Adobe Reader or a similar PDF reading software. You can download Adobe Reader for free at http://get.adobe.com/reader/.
MS Office Resources (PowerPoint, Word  , and Excel
  )
)
You may encounter other resources posted on the course site including PowerPoint, Word, or Excel documents. Due to compatibility issues on computers, you may experience issues opening files. It’s important to ensure you have MS Office or a compatible program on the computer you're using.
Depending on how quick your computer is and whether you're using high speed or dial-up Internet access, it takes some time for a document to open. After you click on the icon, you'll usually see a blank white screen while the file is uploading. On a fast computer with high-speed Internet access, it may take 30 seconds to a minute before the file appears. For older computers or a slower Internet connection, it could take several minutes for documents to load. This is a good time to walk away from your computer for a minute or so . . . to go get a coffee or something. Otherwise, you'll be tempted to keep clicking away and then the computer has other commands to deal with. It gets "confused" or "overwhelmed" and can increase your wait time as documents load. Remember - the mouse has a higher priority so, every time you click or move it, you are telling the computer to “stop what you are doing, I need something else.”
The version of MS Office you have may be older than the file you are trying to open. You can either open it on a computer with a newer version or contact us to send you an older version of the document or to send it to you in a different format (e.g., PDF).
For PowerPoint files, you can download a viewer at https://support.microsoft.com/en-us/office/view-a-presentation-without-powerpoint-2f1077ab-9a4e-41ba-9f75-d55bd9b231a6. Many PowerPoint files include narration so be sure to open it on a computer with speakers so you can follow along.
Depending on the computer and Internet browser you are using, you may find the file doesn’t open up automatically. You may find it in the Download folder on your computer. Check there if you don’t see anything pop up.
3.4. Problems Opening Resources
Occasionally, you may experience some problems trying to open the resources posted within the course. This could be due to an issue with your computer / Internet connection, our server, the course site, the resource itself, or a combination of any of these factors. Please let us know immediately (phone our office, email techsupport@lifestrategies.ca, or a post within the Technical Support discussion forum) if you can't open a resource. Our team can help you to access the resource or provide an alternative.
To best support you, our team will need to know the following:
- Name of the course you are enrolled in
- Name of the resource you are trying to open and topic it is posted in
- Operating system you are using (e.g., Windows 8, OS X v10.11 El Capitan)
- Web browser and version you are using
- Details on what specifically happened (e.g., URL no longer active, file won’t download)
- Error message or code
- Be patient - The more you move your mouse around and keep clicking, the longer it will take, as this action interrupts what your computer is trying to do
- Check your system - Ensure that you have the adequate program to view the file (e.g., Adobe or PDF viewer)
- Log out and in again - If Moodle is experiencing a temporary glitch, you may simply need to log out and back in again
- Restart your computer - Sometimes, glitches in your system can be solved by simply restarting the computer thus closing any interfering programs
- Don’t panic - If you’ve notified our team, we will get back to you within 24 hours with a solution. Don’t let this problem get overwhelming or frustrating by trying the same thing over and over again. If you are concerned this issue will impact your completion of course requirements in a timely fashion (e.g., assignment submissions), email your instructor directly.
4. Course Activities
Course activities include:
- Discussion Forums
- Assignments
- Wikis
- Chat Rooms
- Lessons
We've described several of these activities here.
4.1. Discussion Forum
To participate in a discussion :
- Read the opening post
- Almost all discussions will have an opening thread started by course administrators. If not, start your own discussion by clicking “Add a new discussion topic”
- Click “Reply” when you’re ready to respond
- Compose your reply in the message box.
- For more options, click "Advanced" on the bottom right
- You'll notice some common formatting options (e.g., bulleted lists, bolded font) are available to you.
- If you don't see a function you are looking for, click the downward arrow icon on the left (
) to view more options.
- Some students prefer to compose their reply in Word and then copy and paste it in. If you do this, please be aware that your formatting may not copy over perfectly. In addition, special formatting (e.g., icons, emojis) may also generate an error in your submission so should be avoided.
- Adjust your subscription settings (optional)
- By default, you are not subscribed to receive email copies of posts to this forum
- Attach a file (optional)
- You have two options to upload a file (a) dragging/dropping the file or (b) using the “Add file” button
- Check off “Mail now” if you’d like to send your post to forum subscribers right away
- We DON'T recommend this as it removes the opportunity for you to edit/adjust after posting.
- Click “Post to forum” to save and share your contribution with the rest of the class.
Please note: to ensure ease and efficiency in setting up courses, we work from templates that are restored to the system. As such, you may notice opening discussion posts with old dates. Please be assured that all courses are set up and checked 1-2 weeks prior to the start date.
4.2. Managing Forum Post
Your preferences can be accessed from the LearnOnline home page or from within your specific course at any time.
If you are subscribed to a discussion forum, you will receive email notifications when others contribute. Although this can be helpful for keeping track of course activities, it can also get overwhelming, especially with larger groups. You can always manually subscribe to a particular discussion when you post to it.
To manage your discussion/forum posts settings:
- Click on your name at the top right-hand side of the page
- Select "Preferences"
- Select "Forum preferences" from the User account list
- Review and adjust your preferences
- Email digest type:
- No digest: you will receive one e-mail per forum post*
- Digest - complete posts: you will receive one digest e-mail per day containing the complete contents of each forum post;
- Digest - subjects only: you will receive one digest e-mail per day containing just the subject of each forum post.
- Forum auto-subscribe:
- No: don’t automatically subscribe me to forums discussions*
- Yes: when I post, subscribe me to that forum discussion - Forum tracking: Set to “Yes: highlight new posts for me;” this is a very helpful function for keeping track of new messages.
- Forum tracking:
- Yes: highlight new posts for me*
- No: don't keep track of posts I have seen
- When sending forum post notifications:
- Mark the post as read
- Do not mark the post as read*
- Click "Save changes"
Our recommendations are indicated with an asterisk.
4.3. Responding to Discussions
Cutting & Pasting Content
We’ve discovered that it may not be that straightforward to cut and paste from Word into Moodle. Some issues include:
- Formatting that either doesn’t copy over correctly or “hidden” copies over but cannot be edited
- Coding that is automatically added to your post which may or may not be visible to you until you post
As such, if you decide to cut/copy a selection and paste into Moodle, we recommend to:
- Compose content within your normal word processing program
- Highlight and copy/cut the content as you normally would
- i.e., Right-click and select “copy” / "cut" or use the keyboard short for copy (Ctrl + C) / cut (Ctrl + X)
- Navigate to where you’d like to paste the selection
- e.g., discussion forums
- Paste in content as plain text
- i.e., Right-click and select “paste as plain text” or use the keyboard short (Ctrl + Shift + V)
- Note: If you use the normal “paste” / Ctrl + V option, you may need to highlight your text and use the “clear formatting” feature from the HTML editor
- Save/post contribution as you normally would
Spell Check
When posting to discussion threads (within each topical forum), you will want to ensure your contributions are free from spelling errors. With the enhanced abilities of Internet browsers, spell check is now a common function Firefox, Google Chrome, Safari, and Internet Explorer. Ensure you have installed the latest version of their browser and enabled the spell checker in your browser settings. We have included some directions for the most common Internet browser systems below:
- Firefox: This is in Preferences > Advanced Settings > General
- Safari: This is in the toolbar > Edit > Spelling and Grammar > Check Spelling While Typing
- Google Chrome: Settings > Languages > Language and input settings > Enable spell checking
Remember, spell check will only look for misspelled words, not incorrect words, so read carefully before posting!
Site Time-Outs
Nobody wants to lose what they've typed within the discussion forums, especially if it took a long time to compose a post. Our forums are set to "time out" after 4 hours (e.g., if you walk away from your computer, with a reply partially composed but not posted, you'll lose it after 4 hours).
For longer replies to a discussion thread, it's likely a good idea to prep your response using your word-processing software (e.g., Word) that is usually set to save every few minutes. You can then cut and paste to the course site when you’re ready to post your discussion. Please see the section on cutting/pasting into the Moodle system.
Bottom line is "computers crash" so it's always a good idea to save as you go. Another option is to post your partial message to the site. You have 30 minutes to edit any of your posts. If for any reason you need to edit your post after the 30 minutes has passed, please email your instructor with the edits.
4.4. Assignments
Submitting Assignments 
After you have prepared your assignment offline using a word processing software, you can submit your assignment on the course site
- Select the specific assignment
- Click "Add submission"
- Find the file submission box and either drag and drop your file in or use the Add file icon
- Click "Save changes"
- Review submission status to ensure it reads "Submitted for grading"
- Please verify that you've submitted the assignment for grading and not as a draft. Draft submissions won't show as a completed task; however, your instructor will generally accept draft submissions as final once the due date passes.
Reviewing Feedback
Instructors will grade and return feedback via the assignment feature. In most instances, you will receive an email notification that your assignment has been graded. Generally, detailed feedback will be provided to you using the comments / track changes feature within Word. When reviewing feedback, be sure that your review settings are to show "All Markup." If you need more details on seeing edits within your document, visit Microsoft's help page.
Viewing Final Grades
Your final grades will be available at the end of the course. They will be posted within the "Grades" section of the "Navigation" panel (i.e., see the slide-out menu on the left-hand side). We recommend students print an unofficial copy of their grades from the gradebook on the course site for their own records.
4.5. Wiki
The Wiki enables you to work collaboratively with your fellow students to add, expand, and change the content. It may be helpful to think of it as a white board or flip chart.
To contribute to a wiki:
- Read the directions and any existing contributions
- Select the “Edit” tab to access the editing functions
- Only one person can edit at one time
- Make your contributions and edits within the HTML
- Some common formatting options (e.g., bulleted lists, bolded font) are available to you.
- If you don't see a function you are looking for, click the downward arrow icon on the left (
- Click “Save” to share your contribution with the rest of the class.
- If you would like to review your edits first, click “Preview” – changes will not be saved until you click save
In some courses, you will need to work collaboratively in a wiki on a specific activity or task. Here you can edit each other's work (great for catching spelling mistakes), add comments (just like you might have a conversation with each other before adding a bullet to a flip chart), and can expand on an existing point (consider using a different colour and adding your name or initial).
In other courses, you may find wikis as group activity sign-up sheets. Here a table will be uploaded for you to find a partner, entering your name any other requested information.
Older versions are archived and can be restored by course administrators.
4.6. Working Effectively with a "Virtual" Group
For those courses requiring group work, you will generally find a designated sign-up Wiki early in the course to assist you in forming groups. Typically, a table within the Wiki will stipulate what information to fill in when joining a group (e.g., name); however, you are welcome to add columns/rows. As some offline communication will be necessary to coordinate/complete your assignment, sharing your contact information is important so that your partner / other group members know how to contact you outside the course platform.
Coordinating schedules can be tricky in this virtual world. This is why, when you're collaborating on an online project, it's so important to check in often (2-3 times a day would be ideal), both with the project website (in this case, the course site) and also with the email that you're using.
If you can make that work (and not everyone can because of travel and limited computer access), you'll actually find it much easier to work online. You might even find it helpful to connect using an Instant Messaging systems (e.g., Skype) or web conferencing (e.g., Zoom) that you may have access to. You can also exchange any other contact information that you are comfortable with including phone, email, Facebook, and LinkedIn. Given the short timeframe of your courses, we encourage groups to use whichever communication channels work best for them.
As with any group, taking time, in the beginning, to share your expectations and working styles and set "group norms" will make the rest of your time together flow much more smoothly. We strongly encourage respectful communications between students both online and offline and equitable division of responsibilities.
Your instructor can support you if you encounter any issues working with your partner/group.
4.7. Chat Room
To access a chat :
- Select the relevant chat room
- View the available chats
- Select the chat you’d like to enter, or
- Open by new chat by selecting “click here to enter the chat now”
- Your chat will open in a pop-up window
- Your text will show on the right-hand side
- Attendees will show on the left-hand side
- Type your text in box at the bottom of the window
- Hit “enter” on your keyboard to send your message
- End your chat by closing the browser window
Although chat logs should automatically save in Moodle, it’s best to save a copy of your transcript before ending your session to avoid loss (by choosing edit, select all, copy, and then pasting into a Word document that can be saved and emailed to everyone in the group) and permit immediate access.
The Moodle chat is not like Skype or other instant messaging systems. It is not as advanced which results in the following:
- It is built on a short delay between when you type/send the message and when the message appears
- When it refreshes, it does “ripple”
- You can’t see if someone else is online (and active in a chat) until you start typing
- You can’t tell if someone else is typing a message which could leave you feeling uncertain whether to type or remain “quiet.” When in doubt, just ask.
- You can copy and paste into the chat window; however, no formatting will copy over
4.8. Lesson
Lessons will walk you through content in a structured manner. Although these lessons are not graded, they are an important learning activity. Generally, within the lesson, you’ll find some brief content followed by a question. Select the answer you think is correct and click “Submit.” The page will refresh and at the bottom, it will show if your answer was correct and why or why not. If incorrect, we’ll suggest some additional readings to help you better understand the topic.
You can then move onto the next section by clicking “Continue” (or some similar text) at the bottom of the page.
When you’ve reached the end of the lesson, you can return to the main course page.
Some lessons can only be completed once, whereas others permit you to attempt repeatedly. In most circumstances we’ve also included a progress bar so you know how far along you are in the lesson. If you are attempting the lesson for a second time, the progress bar will reset.
4.9. Activity Completion Status
As you navigate your course, proceeding through the topical learning activities, you will notice little boxes on the right side of each item. Some of these boxes are solid lines, which indicate required activities (![]() ); the others are dotted and optional (
); the others are dotted and optional (![]() ). Required activities have their completion status set to automatically fill in. A box that has been ticked indicates that you have clicked on the item and have viewed its content. You can also manually tick the boxes for those optional items.
). Required activities have their completion status set to automatically fill in. A box that has been ticked indicates that you have clicked on the item and have viewed its content. You can also manually tick the boxes for those optional items.
Students can view their activity completion statuses in a box on the left side of the page:
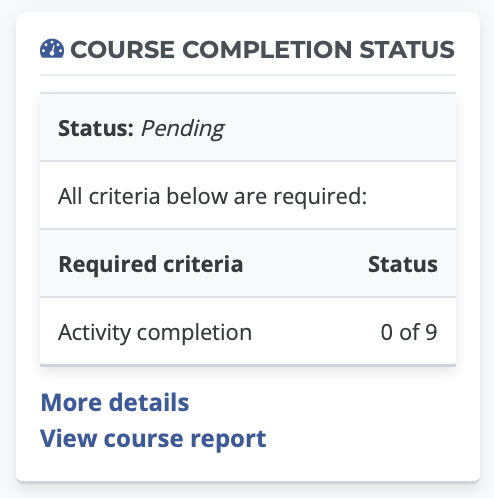
Students can use this to keep track of their progress throughout the course. This is also visible to instructors and course administrators, who can monitor the class's progression and make adjustments where and as necessary.